Monday, July 30, 2018

"Our Library Rocks"--Felted!

WE all know that libraries rock, but in 2018--LIBRARIES ROCK! That's the summer reading theme and we are using it to exclaim from the rooftops just how important libraries are to community enrichment.  Since the Southeast Steuben County rocks in the most amazing ways, we asked Shannah Warwick of Blckbts to show us how to felt rocks.
Dyed Wool

We felt for rocks in the park and felt those rocks just needed to be concealed.  Painted rocks are all the rage, but we wanted to clothe our rocks.  Or at least give them a fresh look.


Setting the wool
Each rock got a unique look by taking strips of colored wool, layering it over the rock, then wetting the wool with hot, then cold water.  The heat makes the fibers expand and the cold shocked the fibers back.  This expand and shock treatment causes the fibers to interlock and create a new fiber--FELT.
Rock in Process
Once each rock was completely covered, they were doused in a cold water bath with vinegar.  The vinegar balanced the pH of the wool and soap.  A wet animal smelling rock remains, but after a few hours of drying, it looks like a soft sculpture.
Covered and Cozy
The method was simple.  Hot water, cold water, LOTS OF SUDS, agitation--the kind that releases personal tension, but makes the wool stick in place, and tons of fun conversation made this little colony come to life.
Rock Band

If you need a new way to rock your library, try some wool to felt your sediment.
That felt good
That's a wrap for First Friday Art Club with me.  Check on my Pop-up library excursions in the coming months with a new blog, yet to be named.  Send me your suggestions and I'll work my magic.  In the downtime, follow our newest project, "Family Folklore-A Paranormal Podcast."  Broadcast from the Crystal City of Corning, New York, it is a goosebumpy experience filled with chills and thrills from local residents of the Southern Tier of New York.  Stay tuned for all the fun things to happen.
email your stories to CorningFamilyFolklore@gmail.com

Thanks for visiting!
xo,
Erica


Thursday, June 21, 2018

Potato Printing

We got Totally Tubular in the June First Friday Art Club.  Printmaking is a great way to personalize any surface, but cost of materials can be prohibitive.  Using the power of plants, we had cost-effective printing implements and developed new skills along the way.
Potatoes to Print
In order to make prints, an artist needs a block.  Printmaking blocks are usually made of linoleum or wood.  Linoleum is easy to carve, but expensive to supply for a free library class.  We used linoleum block carving tools to learn the proper way to cut a printing block, but took advantage of the soft surface of potatoes to equate as a printing block.
Careful Carving
Considering the sharp edges of these carving tools, careful carving was required.  We discussed the ideas of positive and negative space and how to get each image exactly as it was desired.  This concept is difficult to grasp, but once achieved, the options are endless.
Ready to Print
Once the potatoes were cut and dabbed on a towel to dry off excess moisture, students were ready to print.  We used flour sack towels as our printing surface.  Mother's Day followed this class, so a ready-made gift was achievable.
Color Palette
We used Folk Art Fabric Paints and paper plates as palettes.  Foam sponges were great for evenly applying paint to the potatoes.  It is advised to dab the potato surface with color rather than paint it on.  Just a bit of color will transfer from the potato surface to the printing surface with a little pressure.
Dab and Press
Once colors were chosen, the process was dab and press for each print made on the fabric.  Composition was considered.  Some students worked random prints across their printing surface.  Others chose to create a border.
Random Placement
Borderline Love
After mastering the dab and press method of printing with potatoes, I showed students the option of multi-colored monoprints.  A monoprint uses a regular printing block, but is treated in such a way that only one of it's kind exists.  By painting each segment of the printing block, a unique print is made.
Monoprint
That's a wrap for our Potato Printing session.  Check back in July to see how "Libraries Rock!"  Guest artist, Shannah Warwick of Blckbts, will instruct students on felting rocks.
This is an event you don't want to miss!


Thanks for visiting.
I'll check you on the flipside in July.
xo,
Erica

Friday, May 25, 2018

May the Fourth

It's everyone's favorite celestial holiday, May the Fourth!  So in Star Wars style, we created fun crafts to celebrate the Lucas Legacy.
Perler R2D2
A local organization donated two large buckets of Perler beads a few months ago, so I have wanted to test the teen waters with this craft.  May Fourth became the obvious answer as I perused the internet for image inspiration.
What is That?
There are so many Star Wars characters and movies, I just can't keep up.  Okay...confession time...I've only eve watched Episode III and half of The Empire Strikes Back, so I leaned heavily on internet inspiration and student explanation.
Finalized Fun
These characters look great with a little attention to color change details.  R2D2 is my favorite!
Light Sabers in Any Color
These colorful light sabers were simple to sample and lots were made in the time we played.

Icy Sabers
For a fun way to cool down the action, we had Icy Sabers.  I used felt and hot glue to create Light Saber Coozies.  This was a great way to send everyone off into the galaxy.
Go Nuts for Donuts
The option to create something non-Star Wars led to this tasty doughnut.  Homer Simpson approves!

This wraps up another First Friday Art Club at the Southeast Steuben County Library.  
Check back in June to see what we've been making!
Totally Tubular!
Let's get Totally Tubular in June by Printing with Potatoes (and possibly some other vegetables).  Printmaking has never been so easy.  See you soon!

May the Force be With You
This message has been Chewy approved.
xo,
Erica


Monday, April 9, 2018

Quilling

We experimented with the Quilling technique in First Friday Art Club in April 2018.  Using thin strips of paper and tools to help shape each strip, many different objects were created.
Setting up Shop
Learning to roll these thin strips of paper into various shapes was mildly difficult for younger hands, but too  tough for older hands.  Our resident volunteer, Bev Stevens lead the instruction of this technique, because she had practice in quilling from college.
Twist and coil
Taking a color, inserting an end into the slot of the quilling tool and rolling shaped each paper strip into a tightly wound coil.  Using shaping tools like the green one seen above helped create a wider array of designs.
Books provide Inspiration
A selection of books provided inspiration.  Quilling for Beginners, The New Paper Quilling, and Paper Quilling for the First Time gave just the right amount of inspiration and instruction.
Simple Start
Some of us kept it simple to start and some of us stayed in that comfort zone.
Medallions are Fun

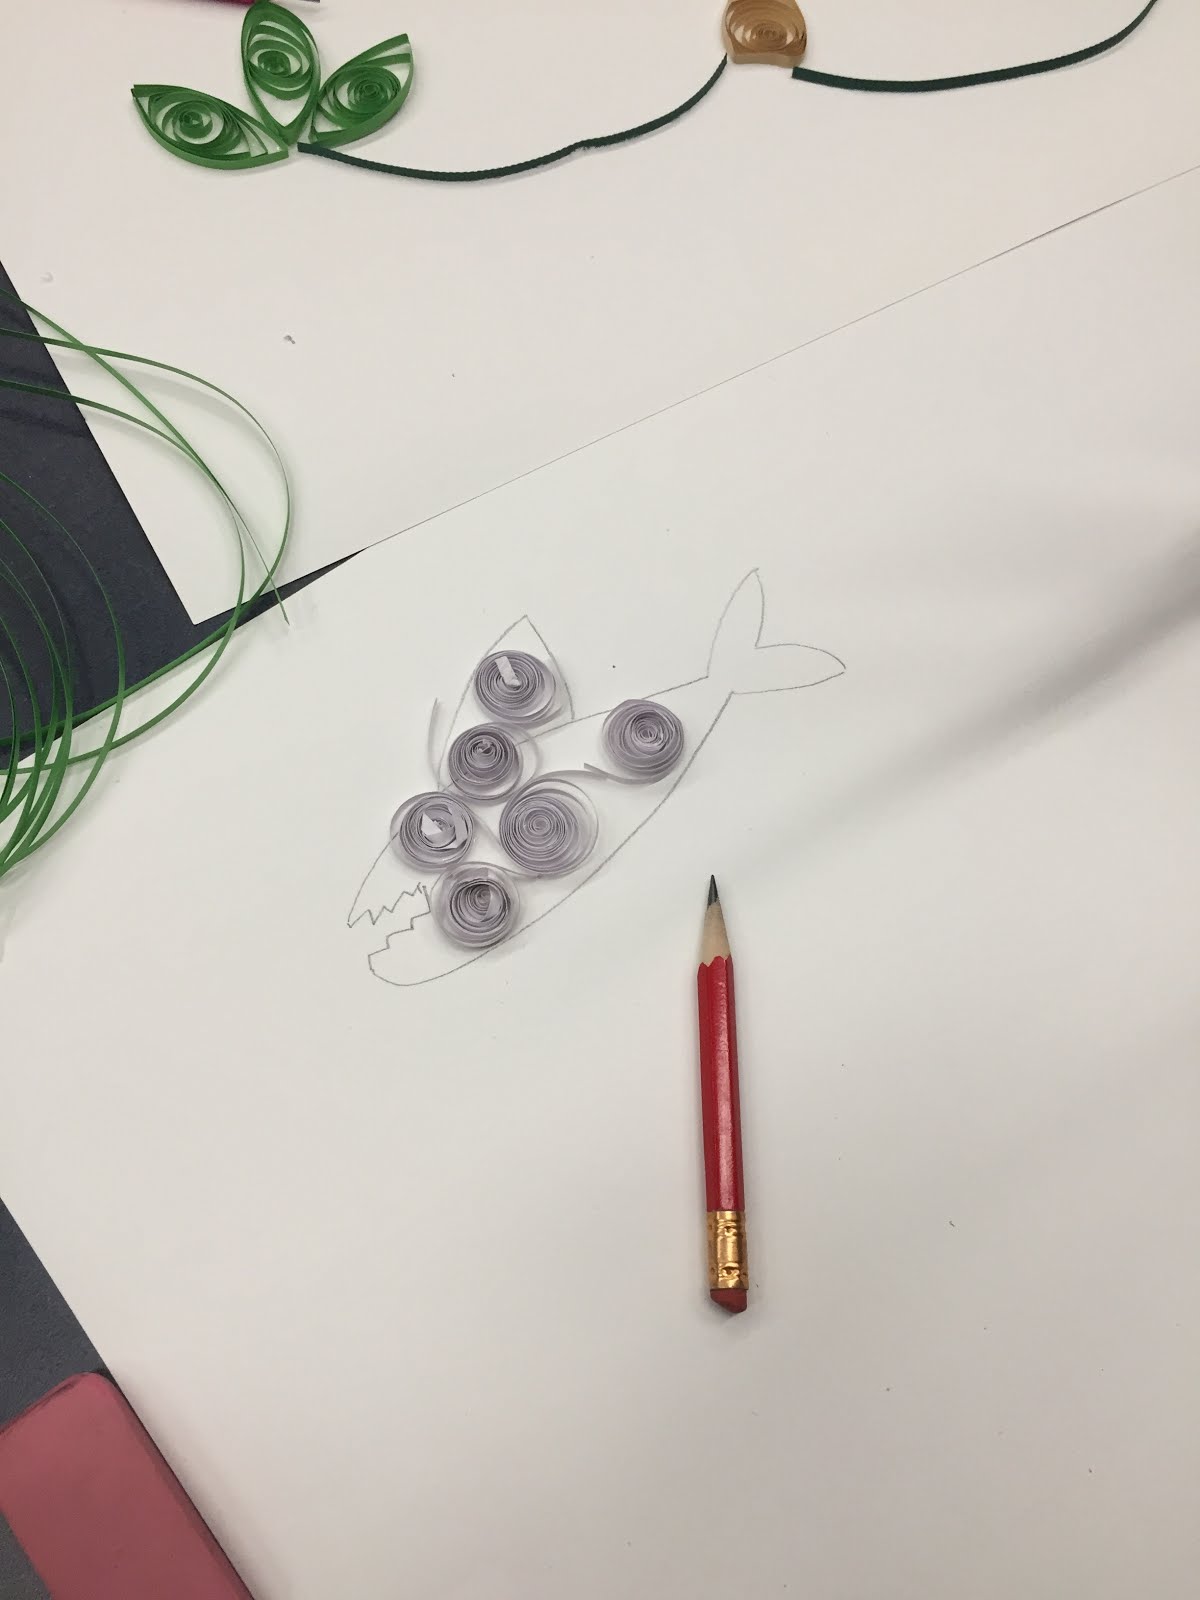
A Shark made the Scene
I was impressed to see some lettering.
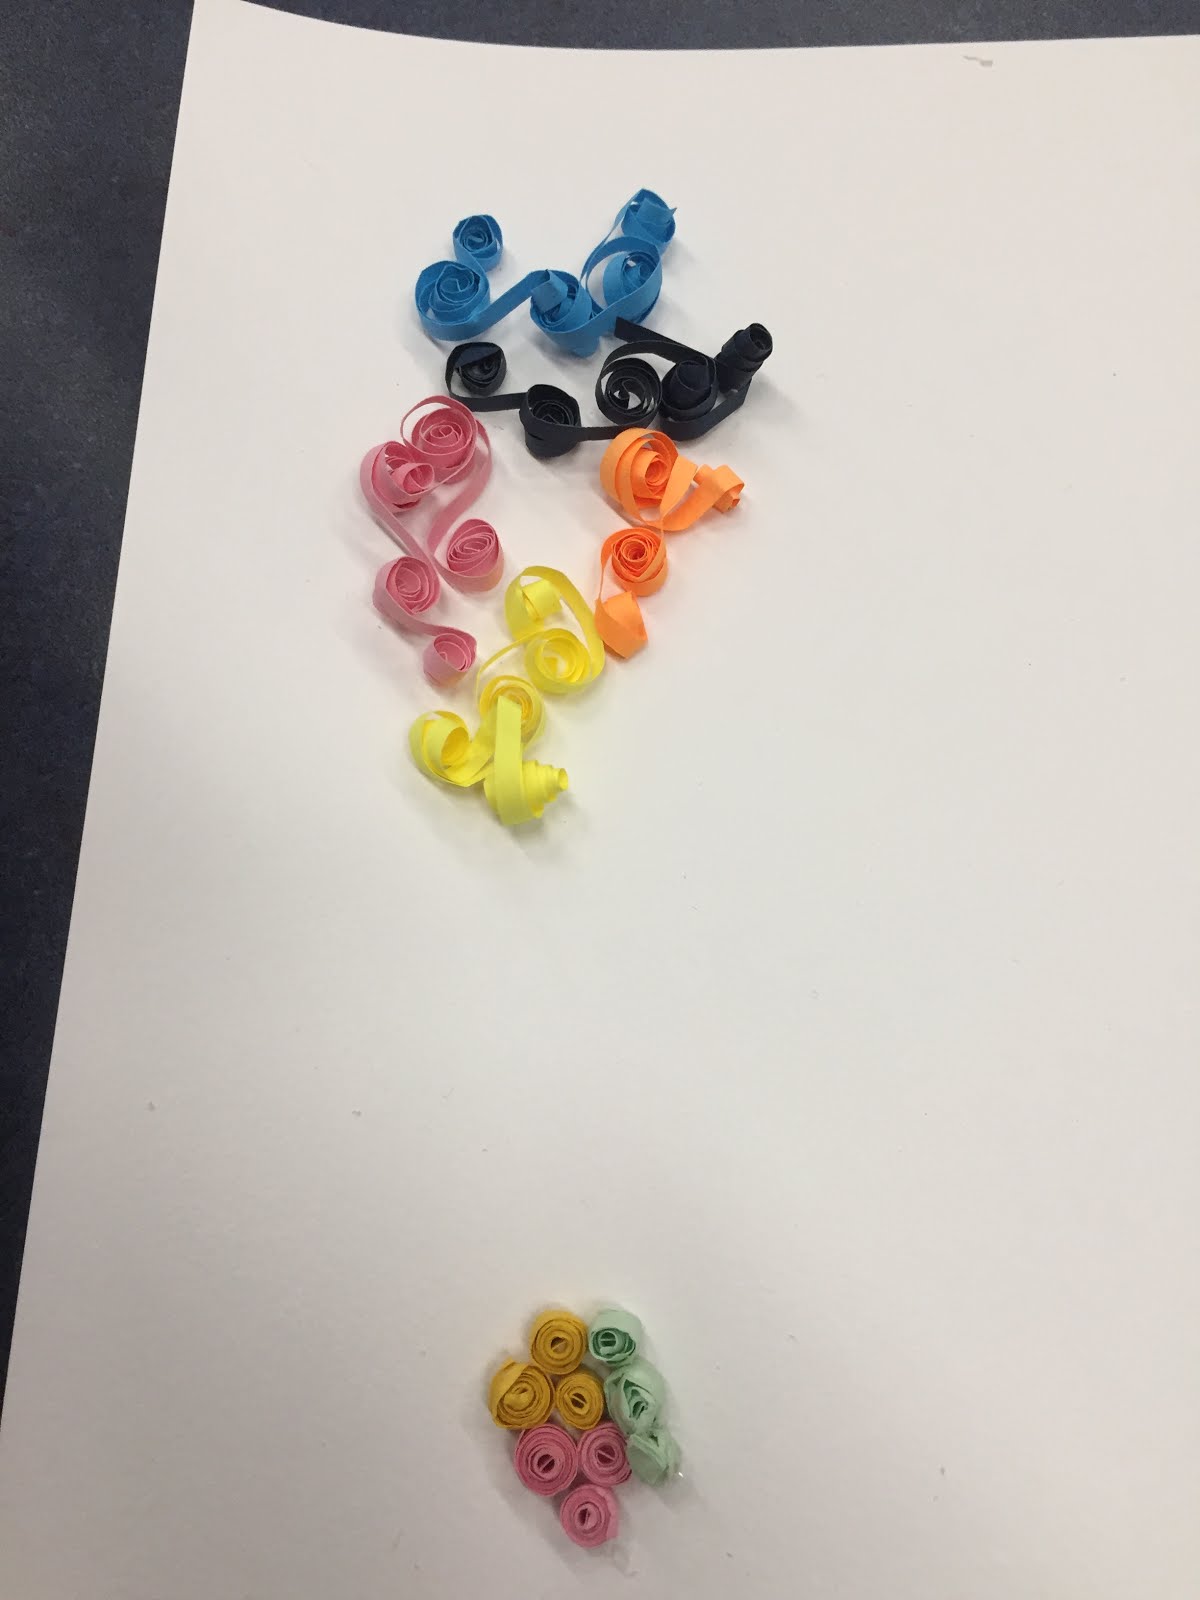
Swirly Rainbow
Nature and books inspired this design.
Dragonfly
The bamboo artist got taken away by the bamboo composition that they plan to return all this week to complete their design.  It looks so cool in person!
Bamboo
Considering the fear that everyone held when we started class, the work created was rather impressive.  This technique requires hours of time to complete, so an hour and a half length class is just a taste of the process.  I look forward to seeing what else these designers make.

Be sure to visit us at the Arnot Mall on Saturday, April 14, from 10am-3pm for the        Twin Tiers Mini Maker Faire.
We have a green screen photo booth for your friends and families to visit unusual lands.
This free event is perfect for the whole family and will provide tons of hands-on crafts, take home goodies and learning galore!  You won't want to miss it.

Thanks for visiting.  Check back again in May when we celebrate a celestial holiday.
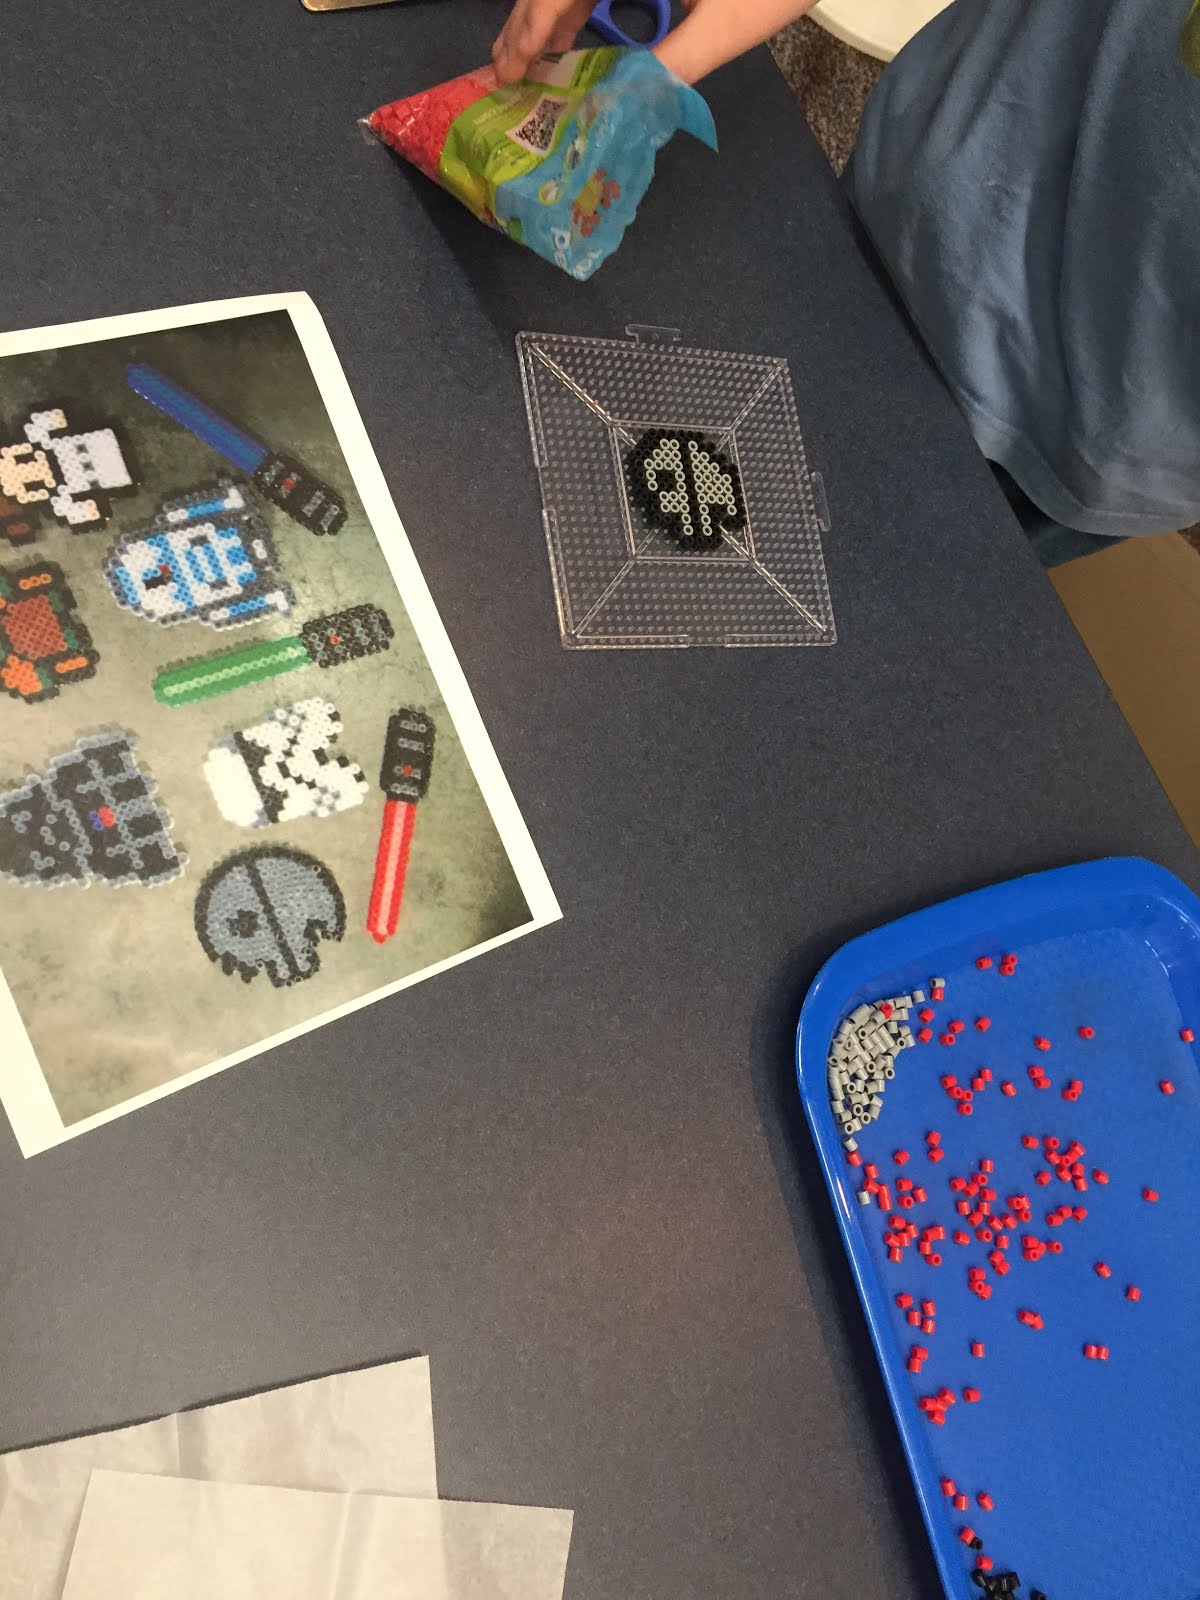
May the Fourth Be with You

xo,
Erica

Thursday, February 22, 2018

Acrylic Cats with Filomena Jack

Rainbows of Color
Southeast Steuben County Library's First Friday Art Club encountered acrylic paints, canvas panels, brushes, and a rainbow of color with Filomena Jack in February.
Welcome to Class
Class started with Filomena's introduction to color theory and the color wheel.  Students needed to know how to mix colors to achieve their preferred palette.  Then instruction proceeded to creating whimsical cats.
Start with an inverted Triangle
Using simple shapes and limited rules, students created their feline's features.  Designs were whipped out quickly with this easy-to-follow tutorial.  Once the cats were on the canvas boards, it was time to paint the base color.
This Kitty has the Blues
Painting the base color of the cat body let each personality shine.  Some folks liked lots of colors, while some chose monochromatic schemes.  "This kitty has the blues," my neighboring student mentioned. 
Not just for Cats
Let's admit that cats are not for everyone.  Some of us love bunnies more; Filomena can attest to that!
Meoowwww!
Once the cat's body was painted, the background needed color, then it was on to facial features.
Grumpy Cat
We saw grumpy kitties, happy cats, scaredy cats, and kittens with attitude arise from their creator's brushes.
Content Kitty
Class time passed quickly, but each student left with a complete painting.  Great work to our students, and BRAVO to our instructor!
Pro-Kitty
Can you tell  who created this cool cat!  We obviously have lots to learn from the master.
Printmaking with Organics
Visit us in March to see what beautiful marks we make after Printing with Potatoes.  It's an easy and inexpensive form of printmaking.  Tell me if you've make marks with organic matter.
See you next time!
~Erica

Tuesday, January 16, 2018

Photo Collage

We celebrated the new year with a Photo Collage lesson in First Friday Art Club in January 2018.  Hoarding a collection of nature photography which was donated by a patron and combining it with discarded magazines, we had a very busy afternoon of creating.
Clip and Arrange
A friend donated hundreds of printed photos of nature last year and I have been saving them for a program like this.  Beautiful images of flowers and insects helped set the mood for my collage.
Clipping for colors
I also had a stack of discarded magazines from the library collection.  Students were allowed to cut and paste images they chose.  The idea of inspiration boards or vision boards was mentioned as a goal for students who were stuck on all the cool images.
Morphed Creature
Vision boards were too limiting to some students.  Junho was determined to create new creatures and characters by morphing elements from other images.  He commented and gave a story line with each new creation, too!
Washington with a Wolf Sleigh
Soon enough scissors and papers were flying.  Characters were popping up and nature was taking shape on our canvas boards.  Things started to get silly with a team of siblings.  We discovered the fabulous feeling of a tech free Friday.
All About Me
Sophia's mission was an "All About Me" board.  She was a quick worker, cutting and gluing without waiting.  She told me as we worked that she does this type of craft at home.  Considering how much technology laden homes can be, it is impressive to find a young student who appreciates the original form of "Cut and Paste."
Work Quickly
We discovered how fast this program can go.  An hour and a half seemed a little too short for this process.  Jina planned to use more of her family photos, but felt rushed to have a final project before she left, so she worked with the images she had pre-cut from magazines.
Very Geometric
It seemed that that we just started to have fun when we only had 10 minutes to finish and clean up.  Therefore, some things got rushed.  I never heard the final story about George Washington or the other morphed character.  The only message we see is to "Leave a Legacy for Wildlife."  We will call that piece, "Beyond Abstract."
Roy G. Biv
Believe it or not, it took the full class time to have a visit from Roy G. Biv.  The color stripes look fabulous, but this piece is not complete.  The artist decided to take it home to continue working.
Mod Podge it Up
After all image elements were in place, I recommended sealing everything in with Mod Podge.  The jar we have dries to a high gloss finish, despite the look of it when wet.  Sophia was the first to get a coating before she left.
Trim the Edges
Some students wanted to have images go off of the canvas.  I said that is a great idea. We call that "Breaking the Box."  Younger students can identify with this idea by coloring outside the lines.  For some students, they wanted a clean edge, so trimming was required.
Elmer's Skin
In our rush to finish, this student realized how gross and fun gluey skin can be.  I remember having so much glue on my hands in art class, I would wait for it to dry, so I could peel it off like skin.  This was totally a thing in the last century (yes, I am that old).  Do students get to play like this today or is technology stealing this experience?
Winter Bouquet
Even with teaching this class, I was able to create my own Photo Collage.  My goal was to brighten my office space during the winter doldrums.  Although I worked quickly, I still need to add a coat of Mod Podge to seal in the edges.  After a weekend on my desk in a warm building, the edges of several images curled up.  A coat of glue will flatten all of it to a smooth surface.

This wraps up another fun First Friday Art Club.  Visit us in February when we paint "Acrylic Cats with Filomena Jack."  Its sure to be a hoot....or a Meow!
Catch you on the Flip Side!
xo,
Erica