Showing posts with label create. Show all posts

Thursday, October 26, 2017

harp & heART with Maryalice Little

Maryalice Little is a harpist who has been training as a certified clinical musician with Harp for Healing.  She inquired to have an opportunity to use her therapeutic music in a youth art program.  First Friday Art Club came to mind and we immediately got busy planning the event.
The beautiful harp
The plan we created was for Maryalice to play several musical pieces, each with a different tempo and rhythm, including recognizable music and improvisational sounds.  For each song or piece of music played, students were given a different implement to make marks on their page. We started the class with graphite pencils.  
Something Familiar
Since pencils are a familiar medium for most students, familiar imagery developed during this segment.  The goal for this class was to let the harp music speak to the heart and create marks on paper using a variety of media.  Making marks is a unfamiliar concept to students who usually have an assigned image to create.  It is very rare for students to test the range of mark making, but it is highly valuable to the artistic process.
Let the music lead the way
The Tate Museum website describes a mark with this excerpt. Mark making describes the different lines, dots, marks, patterns, and textures we create in an artwork. It can be loose and gestural or controlled and neat. It can apply to any material used on any surface: paint on canvas, ink or pencil on paper, a scratched mark on plaster, a digital paint tool on a screen, a tattooed mark on skin…even a sound can be a form of mark making. Artists use gesture to express their feeling and emotions in response to something seen or something felt – or gestural qualities can be used to create a purely abstract composition.
Process through the music
Thinking of sound as a mark, the room was full of inspiration.  Allowing the music to inspire the physical marks on paper set aside thoughts from the day, problems in one's life and kept students in the present time.  This process does not require much thought.  Process feelings and thoughts through the music and leave them on the page.
Dedicated mission
Even with a light and simple expectation for gestural marks on paper, some students had a dedicated mission to continue their daily sketches.  Sometimes comics shine in any medium.
Graphite to Color
After testing graphite pencils, students switched to colored pencils for another option with a different musical set.  This budding artist started to respond to my own erratic scribbling and let the shapes fly into repeat.
Marker Marks
Colored pencil transitioned to markers.  This was the favored media for most students.  This class preferred markers over all our media experiments.  "It's so close to painting." said one very vocal student.
Oil pastels
The last segment of the class introduced a mostly new medium to the class.  Oil pastels are fun to work with and glide over paper so smoothly.  "They make your hands dirty!" complained one student.  I was happy to hear they had the opportunity to experiment with oil pastels in the past.  Despite oil pastels making hands easily messy, they provide a blending option not possible with markers or colored pencils.
Free Flowing
Maryalice ended her musically inspired session with a free flowing, improvisational piece that jumped around and had no recognizable rhythm.  This student reflected that free flowing feel by experimenting with oil pastels.  She appreciated the texture the paper revealed when the pastel was scribbled across the surface.  This revelation is most often the spark for new work with an artist.  Test the waters and work with what floats best.


This wraps up another fun First Friday Art Club at the Southeast Steuben County Library.  Check back here in November to see the wondrous creatures developed during Calligraphy Birds & Beasts with Wynn Yarrow.
register today!
Thanks for visiting,
Erica 


Ps.  Maryalice will offer harp & heART to adults, 18 years and older, on Saturday, November 18, 2017 from 12-3 pm in the library for the Saturday Adult Art class series called Crystal City Creators.  Space is limited, so register today.
You won't want to miss this class!


Friday, July 14, 2017

Steampunked Costumes

Our annual Library Unmasked event occurs at the end of July.  In order to pump up excitement, we hosted a Steampunked Costumes First Friday Art Club.
"Antiqued" Apothecary Jars
To create some Mischief, I worked on antiquing plastic bottles to look like old apothecary jars.  The tutorial I found was perfect to create some decorative elements for the after-hours party.  Taking any bottle from home (Listerine became Mischief Powder), writing a label in marker, tracing it with hot glue for raised lettering, then painting the whole thing with acrylic paints and sponges created a mottled looking bottle perfect for any Halloween or Steampunk party.
Laser Cut Cogs
Cogs and Gears are pertinent elements in Steampunk.  A library staffer discovered how to laser cut using the Steele Memorial Library maker space. We made pins and had enough masonite left over to create some gears for this program.  Quite a lovely and easy necklace.
Cuffs for Protection
Cuffs were easy to create using toilet paper tubes and hole punches.  After cutting the tube in half to open it, this student covered it in gray duct tape, then punched holes and laced it up like a sneaker.
Geared up Gear
This hat was going to the thrift store donations, but was rescued to make Geared up Gear.  
Upcycled!
These plaid shorts were upcycled pajamas.  This student never created steampunk gear, but quickly caught the punking bug by transforming the shorts into a skirt with lace, trims and even made a hat to top off the ensemble.
Can't Get enough Cuffs
Taking old items and making them new, Upcycling, is the best way to create a costume on the cheap.  I stash trinkets and unusual items for programs like these so that there is something to inspire everyone.  Spray and acrylic paints also take those old items to a new level of cool.
Paint and Glue makes New
The kids who created in this program got excited to attend an after-hours party at the library.  Most were not familiar with the Steampunk theme, but quickly caught on and were ready to bring their best cosplay to the event.  We look forward to seeing their final look on July 28, 2017, 6:30-9 pm.
See you There!

Thanks for visiting.  Check back in August to view our Coil Containers.

Sign up today


Thursday, April 13, 2017

Earthscapes with The Rockwell Museum, part 1

Earthscapes, part 1
The SSC Library partnered with The Rockwell Museum to introduce a 2 part lesson plan called Earthscapes.  Thinking about sustainability, the goal was to create a model home using recycled materials in session one.  Then, in the second session, students will create clay slab landscapes to place the model home in an environment.
Artists get right down to business
After a short Power Point presentation, the artists got right down to business.  We had 5 grocery bags full of various items we salvaged from the trash can.  Scraps from fruit and vegetable packaging, rafts from 3-D printed objects, foam from packing materials, a filter from a furnace, etc. became materials to design a model home.
Cardboard and tape 
Some artists chose to work with cardboard and tape.
3-D Fences
This artist utilized the zig-zag of a 3-D print raft structure to establish a fence for her home.  You never know who you need to keep in and who needs to stay out!


Concentration
I was available to help with any questions, but there was total concentration on the dream home creation.  Glue guns were hot, glue sticks were melting away and foundations set.
Foam Staircase
The use of high density foam represented a staircase for this fortress. 
 A water well was considered, as well as a trap door to keep out trespassers.
Escape Plans are Important
This artist used foam for floating capabilities in case of flooding. 
 Towers allow for secret passage ways.
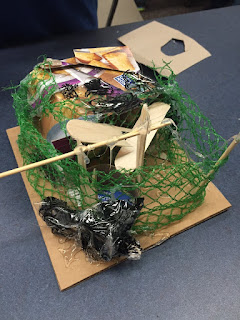
Organized "mess"
This dream home was meant to look messy. The exterior of this building gives visitors pause to enter, so what intruder would know the gorgeous mansion inside?  Strong imagination proved this fortress is secure and PLUSH inside.  It's certainly a haven in disguise!
Tipi Takes Rank
The only tipi structure came to fruition quickly, but I'm not quite sure what the red and green containers represent.  I teased that it was never ending tomato and avacado buckets to make bottomless bowls of guacamole.
Truffula Trees and a Pergola
When Truffula Trees grace a pergola, you know this dream home is intended for warm climates and safe surroundings.  The artist intends to live near no predatory animals and only see clear blue skies and sunshine 365 days a year.
Clean Lines and Clean Water
The spirit of conservation struck this artist when he used simple, clean lines to create his structure.  Having a dedicated clean water supply was of utmost importance, too.  The netting works as shade, but the open roof allows in plenty of sunlight for indoor gardening.
Feels like "Fallingwater"
As this student created her yoga getaway, I remarked how this dream home resembled "Fallingwater," by Frank Lloyd Wright.  She had never heard of that home, but recalled the ever-important architect's name from a school lesson.

Building with recycled materials and considering how to maintain a sustainable existence for humans on earth was a thought provoking subject for students.  They considered predators, intruders, protection from elements and daily needs like food and water.  Imagination and creativity enabled them to develop wisely designed homes for their clay slab landscapes.
Check back in May to see where these dream homes land.
 You never know what teens will make with piles of trash and lumps of dirt!


Friday, April 3, 2015

Crayon Encaustic

Encaustic is a wax based paint, applied while hot.  Our never ending crayon supply donated from various families needed to go, so I thought Crayon Encaustic would be a neat adventure.  This is the blog entry that goes from "Hmm, that's interesting" to "Oh My Goodness, this is an atrocity!"

With an overflowing crayon collection, this Crayon Encaustic for Kids tutorial surfaced in my Google searches.  Candle burning is NOT ALLOWED in my library, so I considered another method.  Lo-temp hot glue guns were suggested in other tutorials, so I decided to venture down that path, hoping along the way that no child get marred in the process.

Things started like this
The very small class of 4 girls helped me set up the space with drop cloths, extension cords and color stations.  We labeled each glue gun a different color to keep the color true through the gun.  We did not want muddy colored paintings.  It was quickly realized that imagery was not very reachable, the crayon just dripped from the gun.  It was further realized that the guns were terrible!  They leaked crayon from the seams and even shot hot wax crayon out unexpectedly.  I am lucky that mature students were present for this class.  I DO NOT RECOMMEND THIS PROCESS TO ANYONE!! (<if you've had luck with this process, please leave a comment--I'd love to hear your experience.)


Things were really just a series of colorful drips of wax.


Imagery might be achieved if we used a different method.  A few years ago, we used hair dryers and heat guns with more direct results, but not better imagery.  Perhaps we need a hot plate and lots of brushes like the pros.  Since I was using up old materials, I took the least expensive route.  Canvas panel boards (8x10") were sourced from Amazon.  Lo-Temp glue guns were sourced from Walmart.  This program cost about $60 with enough supplies to serve 24+ students.  Perhaps on another day (our class was on Good Friday) more students would have been present.  Perhaps more students would have experienced the frustration we did with this terrible art process.

Next month, join us for a lesson on Visual Thinking Strategies with Mieke Fay from Corning Museum of Glass.  Until then , please enjoy my Crayon Encaustic painting.
My own "Series of Dots"


Tuesday, December 16, 2014

Make & Bake

That time of year has come and gone again.  Make & Bake is a program combining Teen Cooking Club and First Friday Art Club into a 2 hour creation fest.  I remember being too young to work and lacked enough craft supplies to make cool things for my friends and family.  Therefore, I scramble through the year for supplies necessary for my teens to make marvelous treasures for those they love.

This year we hosted a special collaboration with Amy Ruza from The Rockwell Museum for attendees to make ceramic ornaments for the holidays.  Although I had several tables set up for various crafts, the ceramic ornaments table stole the spotlight!

The flurry of activity gave way to these:
The tough part of making ceramics is waiting for them to be fired (not like what Donald Trump does to people on The Apprentice!).  We may not have these ready in time for Christmas, but I think gifts are extra fun when the holiday is passed, but there is still something special to give.

Along with these ceramic specialties, there were Snow Bottles to create.

Wine bottles look extra elegant when spray painted and dipped in Epsom salt.  The inspiration came from this blog.  I sourced plain bottles and was very happy not to peel off labels, etc.  We drew in hot glue as a resist for the spray paint.  Then sprayed white primer, followed by spray adhesive and Epsom salt.  The hot glue can be peeled off to reveal the clear glass once everything is dry.  I added LED lights to mine for a festive effect.

Hand sewing skills were required for these cute handwarmers.
Some kids got creative with the fabric designs.  I wish these were made for me!

Scented pine cones were another option, although the ceramics took away any interest in natural objects.
After 1 hour of baking out any bugs, spritz the cones with essential oil water.  We broke tradition and used oil of Wintergreen.  Mmm!

These yummy Salted Caramel Turtle Thumbprint Cookies were a special treat made by me, because we simply ran out of time.  While the kids created, I baked!  These are so fabulous, go ahead and bake them, but please, please, PLEASE share with me!!!

Now you have the sources to make your own hand made gifts for your loved ones.

Merry Christmas!

Love, Erica


Tuesday, August 19, 2014

Paper Beads

Now that I have a chance to focus and reflect after the 6 crazy weeks of Summer Reading Program, (*SRP is FUN, but very busy!!) I can recap some programs that passed.  

Way back (those two words always remind me of the Way Back Machine, have you ever tried it?!?--oh I've digressed)...
Way back in May, I honored Mother's Day with the First Friday Art Club.  I like to consider holidays as opportunities for my teens and tweens to make gifts to give, rather than keep.  Considering May is for Moms, we learned how to make beads with simple materials and instructions, so the techniques could be copied at home.

I collected maps, magazines, weekly grocery ads, even paper from recycling bins to supply the program.  Very cheap inexpensive program potential.  Beads like our examples are available for sale in fair trade stores and online, but whenever I can DIY, I need to share and not shop!

simple supplies and instructions led the way to complete creativity
I began the program with this simple handout showing 3 main bead shapes to give inspiration.
After a few minutes of demonstration on cutting the paper on a protective surface (we want to keep our tables forever and ever) everyone chose their paper and were on a roll, literally.

Bamboo skewers provided a great tool for rolling and drying the beads.
Aside from scrapbook paper, which I purchased for another program, Mod Podge was the critical element used to seal these beads.  We wrapped the paper around a stick, sealed the end with glue, then slathered the bead in Mod Podge to give it a hard feel and glossy appearance.  


Participants got creative with other accessories, like beads purchased from a craft store.


This craft was quick, easy, relaxing, and, best of all, cheap inexpensive nearly free!

The results were just like items found online or in specialty shops.  It's always gratifying to have successes as simple as this program.


The few beads that were left will be saved for another time,
but I did have fun putting them to use. :-)