Showing posts with label teens. Show all posts

Thursday, June 21, 2018

Potato Printing

We got Totally Tubular in the June First Friday Art Club.  Printmaking is a great way to personalize any surface, but cost of materials can be prohibitive.  Using the power of plants, we had cost-effective printing implements and developed new skills along the way.
Potatoes to Print
In order to make prints, an artist needs a block.  Printmaking blocks are usually made of linoleum or wood.  Linoleum is easy to carve, but expensive to supply for a free library class.  We used linoleum block carving tools to learn the proper way to cut a printing block, but took advantage of the soft surface of potatoes to equate as a printing block.
Careful Carving
Considering the sharp edges of these carving tools, careful carving was required.  We discussed the ideas of positive and negative space and how to get each image exactly as it was desired.  This concept is difficult to grasp, but once achieved, the options are endless.
Ready to Print
Once the potatoes were cut and dabbed on a towel to dry off excess moisture, students were ready to print.  We used flour sack towels as our printing surface.  Mother's Day followed this class, so a ready-made gift was achievable.
Color Palette
We used Folk Art Fabric Paints and paper plates as palettes.  Foam sponges were great for evenly applying paint to the potatoes.  It is advised to dab the potato surface with color rather than paint it on.  Just a bit of color will transfer from the potato surface to the printing surface with a little pressure.
Dab and Press
Once colors were chosen, the process was dab and press for each print made on the fabric.  Composition was considered.  Some students worked random prints across their printing surface.  Others chose to create a border.
Random Placement
Borderline Love
After mastering the dab and press method of printing with potatoes, I showed students the option of multi-colored monoprints.  A monoprint uses a regular printing block, but is treated in such a way that only one of it's kind exists.  By painting each segment of the printing block, a unique print is made.
Monoprint
That's a wrap for our Potato Printing session.  Check back in July to see how "Libraries Rock!"  Guest artist, Shannah Warwick of Blckbts, will instruct students on felting rocks.
This is an event you don't want to miss!


Thanks for visiting.
I'll check you on the flipside in July.
xo,
Erica

Friday, May 25, 2018

May the Fourth

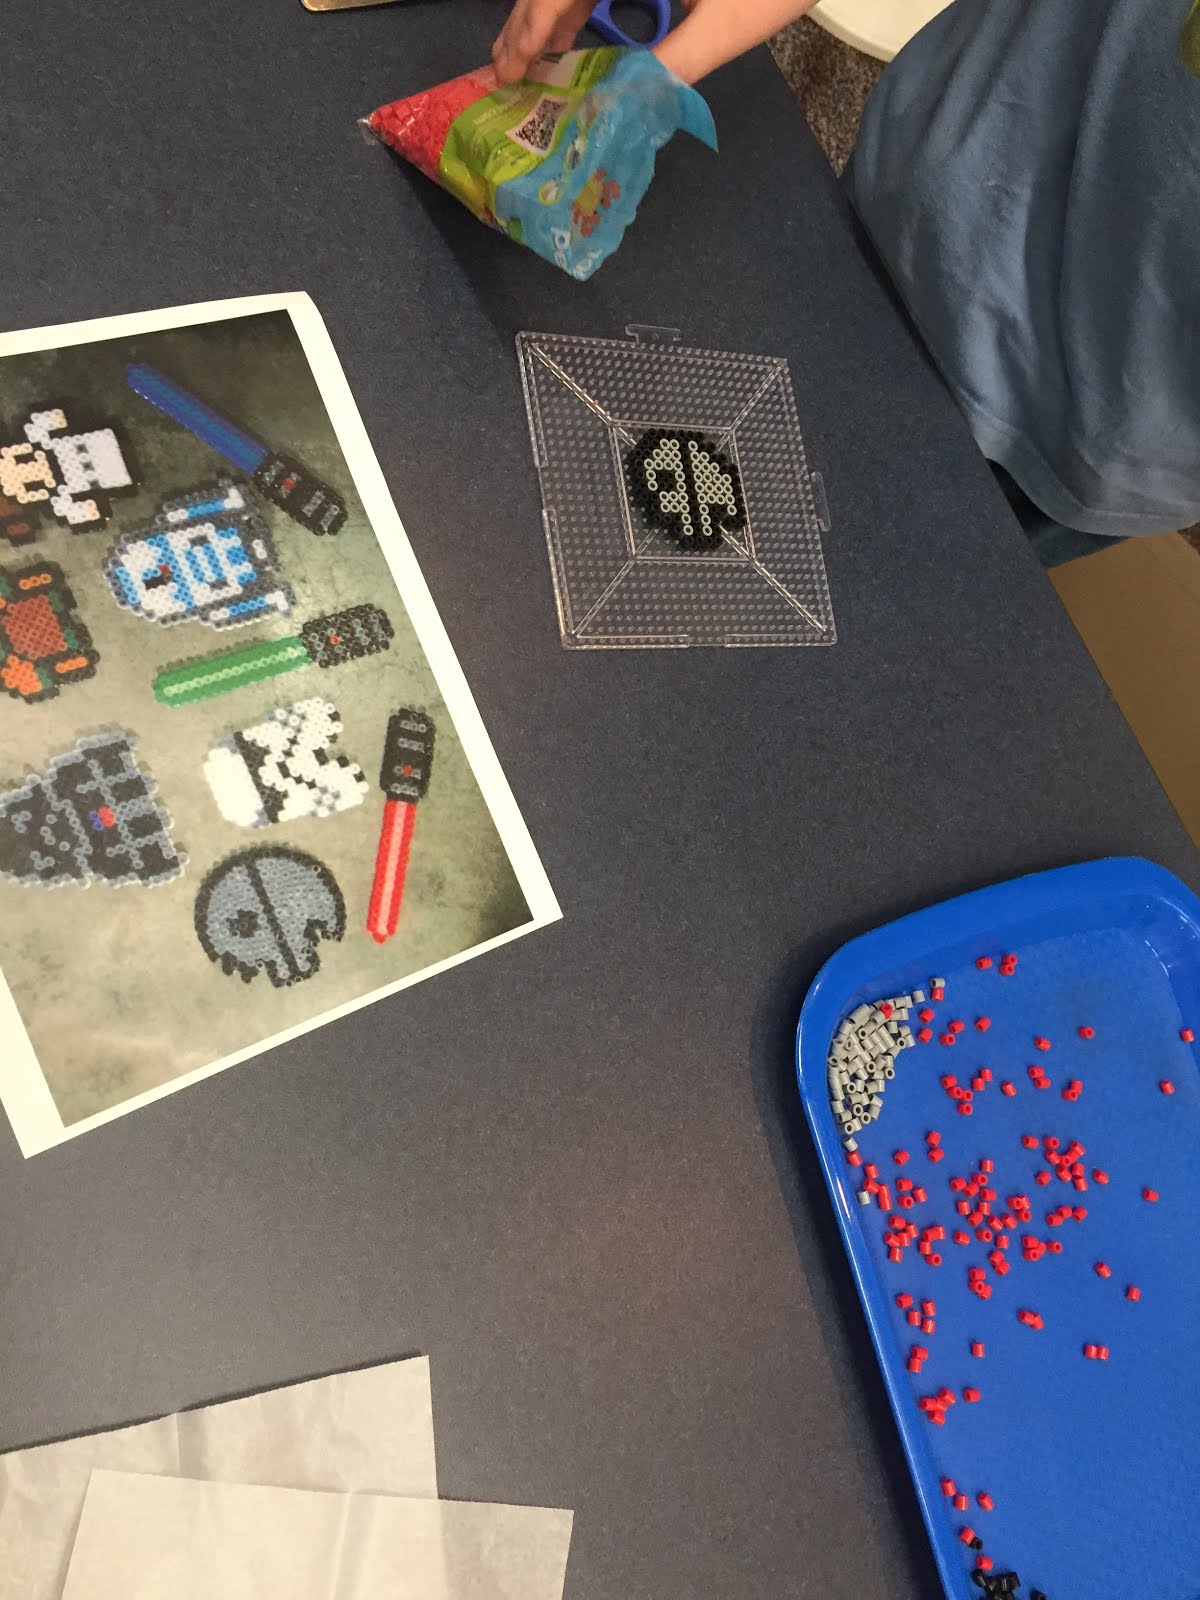
It's everyone's favorite celestial holiday, May the Fourth!  So in Star Wars style, we created fun crafts to celebrate the Lucas Legacy.
Perler R2D2
A local organization donated two large buckets of Perler beads a few months ago, so I have wanted to test the teen waters with this craft.  May Fourth became the obvious answer as I perused the internet for image inspiration.
What is That?
There are so many Star Wars characters and movies, I just can't keep up.  Okay...confession time...I've only eve watched Episode III and half of The Empire Strikes Back, so I leaned heavily on internet inspiration and student explanation.
Finalized Fun
These characters look great with a little attention to color change details.  R2D2 is my favorite!
Light Sabers in Any Color
These colorful light sabers were simple to sample and lots were made in the time we played.

Icy Sabers
For a fun way to cool down the action, we had Icy Sabers.  I used felt and hot glue to create Light Saber Coozies.  This was a great way to send everyone off into the galaxy.
Go Nuts for Donuts
The option to create something non-Star Wars led to this tasty doughnut.  Homer Simpson approves!

This wraps up another First Friday Art Club at the Southeast Steuben County Library.  
Check back in June to see what we've been making!
Totally Tubular!
Let's get Totally Tubular in June by Printing with Potatoes (and possibly some other vegetables).  Printmaking has never been so easy.  See you soon!

May the Force be With You
This message has been Chewy approved.
xo,
Erica


Wednesday, September 20, 2017

Stained Glass Fake-Out

To get students ready for the new school year, I planned a relaxing project for First Friday Art Club in September.  I've seen fake stained glass projects and had them on the "To Do" list for awhile, but a colleague highly suggested this technique, having recently succeeded in the same lesson with a mixed age group.
Blueprints, tracings and color
In order to create a stained glass project, an artisan will create a drawing.  The drawing will then get scaled to the size of the window or project they are creating.  The scaled drawing is called a blueprint and used quite like a blueprint for architecture.  My students were given some time to sketch out a plan for their blueprint using office copy paper.
Careful coloring
Once the blueprint was finalized, each student took wax paper to create their fake stained glass.  I tried to equate the simplified techniques to actual glass preparation.  Students were told to "cut" their glass by tracing their blueprint with pencil onto the less waxy side of the wax paper.  The less waxy side of the paper accepts the marker ink better than the shiny side.  Once their drawing was transferred, color could be added to the composition.
"This part is my favorite."
The coloring phase excited everyone like the coloring pages that have become very popular.  I had some concern that this project would be too simple and quick for this age group, so I planned to let any quick workers make another.  Luckily that was not an issue.  Each student took their time planning their projects and placing the color precisely inside the lines.
Bold lines and Big shapes
I suggested to keep lines and shapes big and less complex.  No glass maker wants to cut sliver sized pieces of glass.  Adding the lead came or copper foiling would make the process almost unbearable.  With that idea understood and coloring wrapping up, each project needed to be taped to a matte board frame with the fake lead came applied afterward. 
Puffy Paint to the Rescue
The lead came replacement for this project was puffy paint.  I showed the option to outline the shapes in each composition with black sharpie, but also showed the puffy paint example and everyone gravitated toward that look.  By framing the wax papers first, the projects were less flexible and easier to take home, even with wet paint. 
Simple instruments
This project is achievable for many age levels and has been proven successful with varied ages in the same class.  Sharpie markers are suggested for their ability to stay and not smudge on the wax paper.  Rulers, copy paper, puffy paint and pencils were other simple instruments used to created this relaxing project.  No glass means no fingers cut!
Hold it up to the Light
Holding these finished projects up to a window let them truly shine. 
Simple and Sweet
Larger shapes to give the viewer's eye more to view would 
make this composition even more lovely.
Simplified Landscape
This artist skipped the black puffy paint at first, but then added it later.  Good choice!
Color every Inch
This artist chose to color every inch of her composition. I feel this was the closest resemblance to stained glass and would love to see it in glass form....
any makers ready to take on that challenge?

This wraps up another month of First Friday Art Club.  Join us in October for harp & heART with Maryalice Little.  There's still time to register!

Thanks for visiting!
~erica


Friday, July 14, 2017

Steampunked Costumes

Our annual Library Unmasked event occurs at the end of July.  In order to pump up excitement, we hosted a Steampunked Costumes First Friday Art Club.
"Antiqued" Apothecary Jars
To create some Mischief, I worked on antiquing plastic bottles to look like old apothecary jars.  The tutorial I found was perfect to create some decorative elements for the after-hours party.  Taking any bottle from home (Listerine became Mischief Powder), writing a label in marker, tracing it with hot glue for raised lettering, then painting the whole thing with acrylic paints and sponges created a mottled looking bottle perfect for any Halloween or Steampunk party.
Laser Cut Cogs
Cogs and Gears are pertinent elements in Steampunk.  A library staffer discovered how to laser cut using the Steele Memorial Library maker space. We made pins and had enough masonite left over to create some gears for this program.  Quite a lovely and easy necklace.
Cuffs for Protection
Cuffs were easy to create using toilet paper tubes and hole punches.  After cutting the tube in half to open it, this student covered it in gray duct tape, then punched holes and laced it up like a sneaker.
Geared up Gear
This hat was going to the thrift store donations, but was rescued to make Geared up Gear.  
Upcycled!
These plaid shorts were upcycled pajamas.  This student never created steampunk gear, but quickly caught the punking bug by transforming the shorts into a skirt with lace, trims and even made a hat to top off the ensemble.
Can't Get enough Cuffs
Taking old items and making them new, Upcycling, is the best way to create a costume on the cheap.  I stash trinkets and unusual items for programs like these so that there is something to inspire everyone.  Spray and acrylic paints also take those old items to a new level of cool.
Paint and Glue makes New
The kids who created in this program got excited to attend an after-hours party at the library.  Most were not familiar with the Steampunk theme, but quickly caught on and were ready to bring their best cosplay to the event.  We look forward to seeing their final look on July 28, 2017, 6:30-9 pm.
See you There!

Thanks for visiting.  Check back in August to view our Coil Containers.

Sign up today


Tuesday, May 9, 2017

Earthscapes with The Rockwell Museum, part 2

We played with clay for the SSCL First Friday Art Club in May.  If you take a moment to read Part 1 of this Earthscapes project, you will know that this clay portion represents a topographical view of a landscape for which our dream homes will be placed.
Amy's and My Earthscape Sample
Amy Ruza from The Rockwell Museum and I met earlier in the month to make the sample you see above.  There are forests, fresh water, mountains and fields within our landscape. 
The clay is terracotta, which has a beautiful brown hue, lending itself to the Earth-like feel.
Roll out a slab and create dimension

The students were instructed to roll out a 1/4" thick slab of clay cut to the size of a sheet of paper.  Then, they placed the clay slabs over crumpled paper to give the clay dimension.  
It was required that each slab touch the table surface on two sides in order to provide
holes meant for hanging vertically on a wall.  

A river runs through it
Once the slabs were rolled out and placed on cardboard sheets for transport and holes were prodded, students had their own choices to make.  Including a fresh water source was HIGHLY encouraged.  It was fun to watch these lumps of mud transform before our eyes!
Rivers, valleys, caves, and VOLCANOES!

Land features such as rivers, valleys, caves and even VOLCANOES developed over these lands.  These adventurous artists represented their own ideas, but also shared their expertise as other students showed interest in certain elements
Let the Underglaze Begin
After the clay landscape was approved, it was time to add color with underglaze.  Blue represented water and the sample above shows a lovely winding river, accessible throughout the land.  Forests for food and exploration were a popular feature.
Each countdown made them frantic
We only have an hour and a half in First Friday Art Club and every minute is precious.  To keep students aware, I give them incremental countdowns until cleanup.  They are always so shocked and disappointed when I say we only have 20 minutes left.  "TWENTY MINUTES?! How did class fly by so quickly?!"
Countdowns make them Hustle!
As you can see, the before and after show how these kids can hustle to get the job complete.  Green grasses, white capped mountains and streams of blue covered our tables.

Fallen Tree
This student considered having a fallen tree available for fire wood when he moves his house here this summer.  The river will be a helpful form of transportation to get that tree to his home!  I'm impressed by that thought process for such a young student.
Off to the kiln
Now that the Earthscapes have been created, they must get fired in the kiln.  The Rockwell Museum has their own kiln and will provide this service.  The items will take two weeks to dry before being fired.  Many students wanted to take these home next week!  
There was a minor lesson in how ceramics get processed.

The SSC Library will exhibit these Earthscapes in July and August as part of the 
summer reading club theme, "Build a Better World."  
Accessibility to art always helps create a better world!

Thanks for visiting this month and checking on our progress.  I'll be sure to show you the Earthscapes on display, but until then, seek the First Friday Art Club blog in June to see what we make with a little help from the sun with Cyanotypes.
~erica


.


Tuesday, February 21, 2017

Nuno Felting with Shannah Warwick

Mrs. Warwick starts the class
First Friday Art Club enjoyed a special guest instructor for February 2017.  Nuno Felting expert, Shannah Warwick of Blckbts sneaked out of her studio to provide a lesson in felting to excited tweens and teens, along with a couple of adults.
"Feel the difference between the fabrics."
After personal introductions and a little vocabulary building--- ie.knowing all of the items and terms used in this felting process, the ladies got rolling right along.  And by rolling, I mean ROLLING!  That action is almost the main activity required in nuno felting.---funny videos pending.
Wool Roving goes far
Learning the wonders of wool roving was step one.  Merino wool is expensive and knowing how to make the most of your materials is important to an artist.  Removing just wisps of the wool to use in your design is imperative for any felting student.
"Wisps of roving shrink in your final design"
Using too much roving in sections will cause uneven shrinkage of the final product and leave an awkward, somewhat unusable shape.  This might be an effect someone wishes to achieve, but not in this class.
Wisp Away!
Students were instructed to find a partner and take turns placing the wool wisps in any pattern they chose, avoiding too much overlapping.  If you look closer, you'll see there is bubble wrap as the first layer-bubbles up.  The next layer is silk chiffon.  The silk is the fabric foundation to the scarf being designed.
Tulle is the next layer after the design is complete.
Once the wisps are placed and the design is approved, the next layer is Tulle (sounds like "tool").  This netted fabric must be patted gently to meet the other layers and not move.  Basically every layer becomes "friends" at this stage.  Then a slight amount of warm, sudsy water is squeezed over the layers to prepare for the felting process. 
Ball brauser is like a magic felting wand.
The final layer to this felted sandwich is another sheet of bubble wrap, this time bubble side down.  The bubbles face inward toward the fabric and once the layers are rolled up, the bubbles, warm water, soap suds, and rolling action cause the fibers to interlock .
Pool noodles have meaning in the winter!
Who knew that pool noodles and bubble wrap were so imperative to the nuno felting process?  Well, Mrs. Warwick was happy to share this knowledge with the First Friday Art Club.  The mandatory therapy of bubble popping was momentarily allowed, but then the rolling had to commence.  The rolling, as promised, was very exhaustive.....
The amount of rolling is a special "science" to this nuno felting process.  Each piece needed to be rolled 800 times.  That's right, 800!  This gave a good upper body workout, but tired everyone out quickly.  After 200 rolls, the layers are unrolled, then rerolled in the opposite direction.  This gives every section equal friction, resulting in a uniform interlocked fibers.
800 rolls should have fuzzies poking through 
Once everyone got their 800 Roll Workout, we needed to peak at the reverse side of the chiffon.  If wool fuzzies were poking through the weave, rolling was complete and the chance to take out some aggression on the project had arrived.

Balling up the fabric, dipping it in warm, sudsy water and tossing it in a sink or tub several times shocks the fibers.  This action might seem too abusive, but it is the final step to making a lovely nuno felted creation.  Whoever said fiber work is just for wimps never put their muscles into this process.
It's like shrinky dinks!
Once the fibers are shocked and shriveled, it was time for the Big Reveal.  Everyone was surprised how much the fabric shrunk.  There is about a 30-50% shrinkage rate in this process.  More shrinkage resulted if there was a lot of wool placed on the fabric.  With less wool, there is less shrinkage.  
Less surface wool = less shrinkage
Everyone loved their wearable art.  Parents who were present requested an adult class to learn this process and have fun with their own peers.  Adults just wanna have fun, too!
Adults want their work to look like Blckbts!
If you are interested in this process or have attempted nuno felting on your own, let me know!  I love sharing experiences, but love seeing what else is happening in the world.

Next month we discover the expressive painting process of Pointillism.  This process made famous by Georges Seurat and Paul Signac avoids paint strokes and prefers dabs and dots.
Let's call it the beginning of dot matrix!
Register Today!
Thanks for following the First Friday Art Club.  
If you visit, please leave a comment on what you like or what you wish to see.  
Your ideas might just might become reality.
Until March...~erica